728 X 90 Ad slot
Sunday, August 21, 2011
How to Change the Width Size of Blogger Blogs
Here is a quick step by step tutorial on how to change the width of your Blogger Blog.
I have provided screenshots of each step - just follow along and you shouldn't have any problems.
Before you start create a backup of your current blog just in case there is a problem.
I will show you how to change the standard template so that the width is the same as this blog. This basically entails 4 things. First you increase the width of the Outer Wrapper and then you increase the width of the Header and then the two columns inside the outer wrapper. This would be the Post column and then the Sidebar column. Lastly you increase the width of your Footer.
You can click on all images to enlarge them.
Step One
Open "Layout" and choose the "Edit HTML" option.
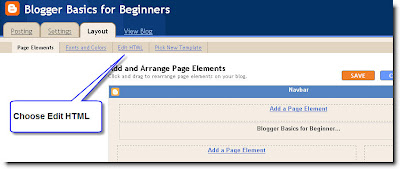
Note: I am using the Minima Template for this demonstration - if you have a different template just find the appropriate section - the steps are the same.
Step Two
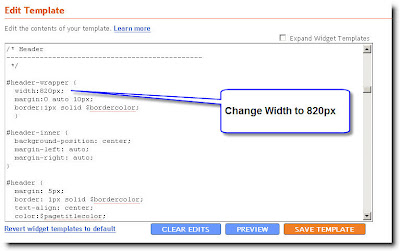
Scroll down to the Header section and change the Header Wrapper width to 820px
Step Three
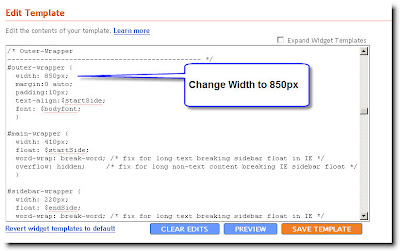
Scroll down to the Outer Wrapper section and change the width to 850px
Step Four
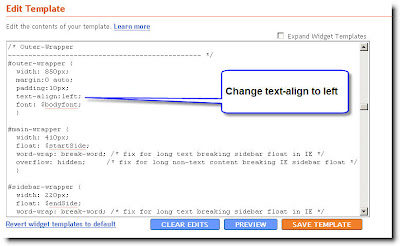
Change the Outer Wrapper "Text-Align" to "left"
Step Five
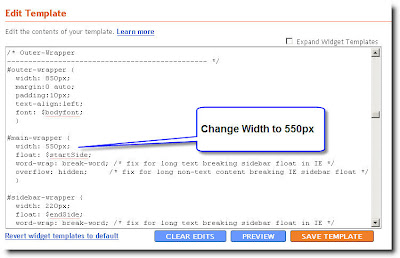
Change the Main Wrapper width to 550px - this is located right below the Outer Wrapper section. The Main Wrapper is your Post Column.
Step Six
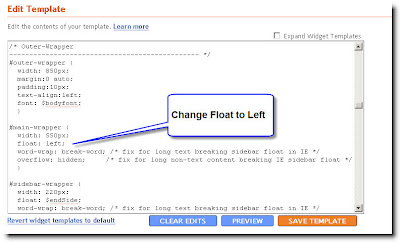
Change the Main Wrapper "float" to "left".
Step Seven
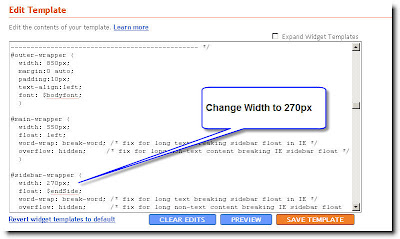
Change the Sidebar Wrapper width to 270px. The Sidebar Wrapper is located right below the Main Wrapper.
Step Eight
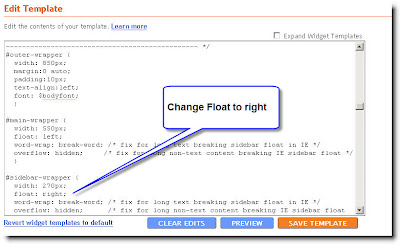
Change the Sidebar Wrapper "float" to "right".
Step Nine
Scroll down to the Footer section and change the width to 850px.
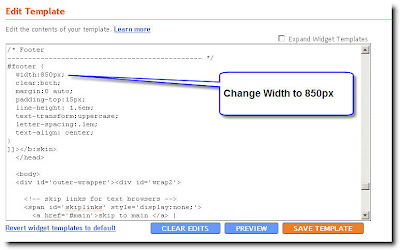
Click "Save Template" and you are done.
This is what you have just done;
You widened the size of your usable blog space to 850px. ( The Outer Wrapper )
Inside the Outer Wrapper you have changed the width of the Three Sections that make up your blog.
1) The Header section - 820px
2) The Main Wrapper section which consists of your two columns;
- The Post Column - 550px
- The Sidebar column - 270px
3) The Footer section - 850px
You will notice the Header section is 30px less than the Outer Wrapper.
The two columns add up to 820px - also 30px less than the Outer Wrapper.
I have made the Footer the same size as the Outer Wrapper.
You can play with different widths but be sure that none of the other wrappers add up to more pixels than what you set the Outer Wrapper at. Your two columns should be at least 30px less than the Outer Wrapper so that they have a space between the two columns. The Header should be a little less as you don't want it bleeding right to the edge. (It just looks better) The Footer can be the same width as the Outer Wrapper.
I have provided screenshots of each step - just follow along and you shouldn't have any problems.
Before you start create a backup of your current blog just in case there is a problem.
I will show you how to change the standard template so that the width is the same as this blog. This basically entails 4 things. First you increase the width of the Outer Wrapper and then you increase the width of the Header and then the two columns inside the outer wrapper. This would be the Post column and then the Sidebar column. Lastly you increase the width of your Footer.
You can click on all images to enlarge them.
Step One
Open "Layout" and choose the "Edit HTML" option.

Note: I am using the Minima Template for this demonstration - if you have a different template just find the appropriate section - the steps are the same.
Step Two
Scroll down to the Header section and change the Header Wrapper width to 820px

Step Three
Scroll down to the Outer Wrapper section and change the width to 850px

Step Four
Change the Outer Wrapper "Text-Align" to "left"

Step Five
Change the Main Wrapper width to 550px - this is located right below the Outer Wrapper section. The Main Wrapper is your Post Column.

Step Six
Change the Main Wrapper "float" to "left".

Step Seven
Change the Sidebar Wrapper width to 270px. The Sidebar Wrapper is located right below the Main Wrapper.

Step Eight
Change the Sidebar Wrapper "float" to "right".

Step Nine
Scroll down to the Footer section and change the width to 850px.

Click "Save Template" and you are done.
This is what you have just done;
You widened the size of your usable blog space to 850px. ( The Outer Wrapper )
Inside the Outer Wrapper you have changed the width of the Three Sections that make up your blog.
1) The Header section - 820px
2) The Main Wrapper section which consists of your two columns;
- The Post Column - 550px
- The Sidebar column - 270px
3) The Footer section - 850px
You will notice the Header section is 30px less than the Outer Wrapper.
The two columns add up to 820px - also 30px less than the Outer Wrapper.
I have made the Footer the same size as the Outer Wrapper.
You can play with different widths but be sure that none of the other wrappers add up to more pixels than what you set the Outer Wrapper at. Your two columns should be at least 30px less than the Outer Wrapper so that they have a space between the two columns. The Header should be a little less as you don't want it bleeding right to the edge. (It just looks better) The Footer can be the same width as the Outer Wrapper.
If you loved this post
This post was written by: deivam P Mohanraj
deivam P Mohanraj is a professional blogger, web designer and front end
web developer. Follow him on Twitter
Subscribe to:
Post Comments (Atom)
Labels
Airtel Vodofone Idea Bsnl
Art
Articles
Astrology
Bank
Blogger Tricks Tips
Cinema
Computer
Cricket
deivam P Mohanraj
Firefox Google Internet ExploreYahoo
Friendz
Games
GK
God
Health Tips
Health Tips in Tamil
Healthy Foods
HISTORY
Images
india news
Indian Recipes
Internet Problems
Kavithai
Links
Movie Review
Mp3 and Torrent
MP3 SONGS
Online
Relationship
Result
Salem Yellow Pages
Sanjith Enterprises
Software
Sports
Tamil
Thirupathi
TN Election
TN NEWS
TNPSC
Videos
world
yahoo mail gmail tips


0 Responses to “How to Change the Width Size of Blogger Blogs”
Post a Comment