
Monday, June 11, 2012
How to increase / Traffic to ur blog
How To Bring Traffic To Your Blog/Hub/Site
Wednesday, August 24, 2011
google bot not visiting Google no follow google not indexing Google noindex
googlebot not visiting Google bot not visiting Google no follow google not indexing Google noindex

To solve this issue kindly click below web site link
http://www.google.com/support/news_pub/bin/request.py?contact_type=report_update
Everyone loves to get their web pages indexed by Google as soon as they write them. If you can guide the GoogleBot to crawl your site easily it will index your pages much faster than your expectations.
Crawling is the process by which Googlebot discovers new and updated pages to be added to the Google index. When the Googlebot visits your website it detects links on each page and adds them to the list of pages to crawl. If your site has got a very authority your pages will get indexed by Google within few minutes. Below are some useful tips to get your pages indexed by Google effectively.
1. Create and submitting a Sitemap to Google. Even if your site is already indexed in Google submitting a sitemap will give Google a better way to understand about your site. If you are using WordPress use any of the plugins that can create a sitemap for you.
2. Register for Google Webmasters Tools and check the crawl error page frequently. The crawl errors page provides details about the URLs in your site that Google couldn’t access. So you can fix the errors once you know the problem area.
3. Make sure that the required URL’s are not blocked by robots.txt file or meta tags. If you are not sure about robots.txt file use the Webmasters Tools to create a robots.txt for your website/blog.
4. Search engines cannot understand images and videos. So if your website has good number of images or videos try to provide relevant information about them.
These are just some of the tips which will help you to get your site crawled by Google effectively. If you have any other tips then do share them with us.
Monday, August 22, 2011
how to post ads in posts of blogger
If you are a regular reader of this blog, you will noticed WordPress is massively discussed but because of any other thing but because of many limitations confer on blogger to tweaks and customize. Blogspot blogs has so many advantages and disadvantages. One of the advantages is the unlimited bandwidth. With a blogger blog, you do not need to worry about “Bandwidth Exceeded”. Also, one of the disadvantages of a blogger blog is customizing. One of which, do not leave room for its users to insert Google Adsense code within post on a single post content. All you get from a blogspot blog is inserting Google Adsense code on the Sidebar, between Posts on the homepage, before Posts and after Posts but not inside a single-page post. No doubt with a WordPress blog, anyone can conveniently do that, even without knowing any code. But with blogger, one can only customize and change things within the narrow framework of blogger. Thus, leading o the limitation of inserting Adsense code directly into Single Post.
Why I Decided to Write About This
Despite the fact that there are numerous resources that contains this solution, I got several fans, friends, and readers of this blog asking me how they can easily insert a Google Adsense code into their blog Single post. The second reason I decided to write this tutorial is, I discovered that almost 80% of blogger from Nigeria uses blogger and thirdly, one of the Google Adsense Placement that performs well is placing ads inside your single post – right below the title of your post. From study and my personal experience, placing a Large Rectangle (336×280) sized ad right under the post title always performs well. It has been said and confirmed (by me) that this kind of ad size have a higher CTR, hence increases Adsense earnings.
If you need to add Adsense code in other places on your blogger blog, you can use the Adsense Gadget just like you use other Gadgets like Text Gadget, Poll Gadget, Profile, etc. Just go to Layout > Page Settings and click Add a Gadget. Select the Adsense Gadget and then configure it to suit your blog’s look.
8 Simple Steps to Adding Adsense Code Within Post
Now to the main topic of this write-up, let us go ahead and add a Google Adsense code into our single post – right below the post title.
1. First thing you need to do is to get your Adsense code from your Adsense account, preferably the Large Rectangle (336×280) sized ad format because the larger the ad, the better the performance – Google confirm this!
2. After you must have copied out the ad code generated from step 1 above, you must parse it. This is done by replacing some special characters with HTML entities. If you do not have an idea on how to parse Google Adsense codes, see this post
3. Next, go to your Blogger Dashboard, go to Layout and click Edit HTML
4. Click Download Full Template to have a backup of your blog template in case other codes are been tampered with.
5. Then click Expand Widget Templates
6. Find and locate the code below:
7. Paste your already parsed Adsense code right above the code above.
8. Save the Template.
NOTE: You must parse the Google Adsense code before pasting it into your blog template. If you do not parse it, your ads will not display properly and you risk been banned by Google.
With that simple steps, you should be able to insert Google Adsense code within post in blogger blog. However, you might decide tomake the ad wrap around your post content, which is also nice. You can make the ad wrap either left (like the one you see on this blog) or right of your post content with the use of the “floating div”.
Your Adsense code will go inbetween the div tag. See below:
After integrating the above code into the code of your blog template, save the template and your ad should be showing within your post – below the post title – left wrapped. If you want the ad to be right-wrapped, replace the ‘left’ in the code above to ‘right’ (without the quote).
How to Only Show Adsense Ads in Posts on a Single Post
To solve the problem of the Sidebar ad unit disappearing on your homepage because you can not have more than 3 ad units on a page, or to stop the annoying showing of ads showing on your homepage, we will be using the pageType tag, which can have a value of ‘item’, ‘archieve’ or ‘index’.
To do this quickly, you need to find the code below in your blog template and integrate your ad code with the code below:
INSERT YOUR ADSENSE CODE HERE
The above code simply means, if it is a single post, include the CODE. So only single post will show the ad – it will not show on your homepage.
At this point, I hope you can now solve the problem of inserting Google Adsense ads into single post content of your blogger blog. Any question? Make use of the Comment Form below. And do not forget to share this with others.
source:http://mycyberblogs.com/blogging-tips/how-to-insert-google-adsense-code-in-single-post-in-blogger-blog/Sunday, August 21, 2011
How Many Unindexed Posts Does Your Blog Have?

We all, hopefully, know that there is a big difference between having a bunch of great content on your site and Google knowing about your content.
Indexing stands between your content residing at the bottom of the internet abyss and your #1 Google ranking.
Let’s take a look at Traffic Generation Cafe for a moment.
This is a very active blog that is crawled by the search engines on a daily basis.
Also, I am extremely thorough at building internal links within TGC, as well as backlinks to my blog from other blogs, which is how Google finds your content to begin with – by following links from already indexed content.
So you can imagine why I thought that all of my older content pages have been indexed a long time ago…
NOT.
As I was studying Andrew Rondeau’s Income Blogging guide – an absolutely brilliant blogging course that will take you from A (how to install a blog, plugins, themes, etc) to Z (how to REALLY make money) of blogging, and even I, an experienced blogger, am amazed how much I am learning from it – I discovered a solution to a problem I knew existed a while back, but never had a chance to look into it.
Well, thanks to Andrew, the solution proved to be simple enough that I took care of my “no-index business” once and for all.
So let me walk you, step by step, through the process of identifying the pages that are currently not indexed in search engines, even though you:
- Added the Google XML sitemap plugin
- Verified your blog via Google’s Webmaster tools
- Added internal links
- Built external one way backlinks
Step 1. How many pages are not indexed?
Go to your Google Webmaster Tools account and take a look at Site Configuration ==> Sitemaps.

As you can see from the image above (click to enlarge), I currently have 271 URLs submitted through my sitemap, yet only 245 of them are indexed by Google.
And as you’ll see from a screenshot I’ll add in a moment, we are talking about older posts here – all my new ones are being indexed almost the same day.
Step 2. Which pages are not indexed?
And that’s where the problem lies.
Google Webmaster Tools will tell you how many are not indexed, but not which ones.
There are plenty of online marketing tools that will check for you if an individual page is indexed by search engines.
But what if you need to check hundreds of them or even thousands?
Step 3. Invest $7 into this piece of software.
Yes, only $7 and you’ll be able to check in one quick sweep which blog pages are indexed and which are not, and not only on your own blog.
You can also check your guest posts.
You can see if you Ezinearticles articles, YouTube video, Squidoo or Hubpages are indexed.
It’s actually pretty incredible – that’s what I thought of it once I started playing with it.
Here’s a screen shot from my blog, after I ran some URLs through it to see what’s going on with my indexing:


Discover Which Of Your Web Pages Are NOT Indexed In Google.
Step 4. Install IndexChecker.
The instruction PDF will let you know how to install the software to your blog directory.
However, I struggled a bit with their directions, so I made a video to show you step by step as to how to install IndexChecker.
Step 5. Let’s find those unindexed pages.
…and finally take care of this little pesky problem.
Here’s your link one more time -
http://www.trafficgenerationcafe.com/recommends/indexchecker
Happy exploring!
Source: http://www.trafficgenerationcafe.com/blog-posts-indexed-unindexed/
My Blog is not indexing timely l How to get your new blog indexed by Google quickly
How to get your new blog indexed by Google quickly l Google Not Indexing Your Blogs ?

Hi Friends
You would like google to crawl more frequently and index new content more quickly.
In general, googlebot makes its own decision about crawling - it varies enormously from minutes to weeks, depending on how Google see your site.
You should first check that Google can access your site properly; use "Fetch as Googlebot" facility in Webmaster Tools.
Second, check that the time that googlebot has allocated to crawling your site is not wasted;
----- minimize duplicate content;
----- don't allow /tag/ URLs to be indexed;
----- use the robots.txt settings recommended by your blog software provider;
Third, increase the importance/value of your site in Google's eyes:
----- improve the use of English; it is good to have regional variations in the use of English internationally but some very basic errors might be detected as "unnatural".
----- make it better for your visitors so that they spend more time on your site, visit more often, tell friends, and add links from other blogs/sites.
The above are just a few suggestions; there are many more ways to improve the situation.
------------------------------
Four days ago, I launched a new blog called PHP Snippets.
As you can guess, one of my main goal was to get the site indexed as soon as possible in Google so I can start receiving organic traffic.
So, what did I do to get my new blog indexed by Google in only one day? I just used a few “techniques” that even a novice can use.
Be patient
[tweet]I already said it many times, but in my opinion, patience is one of the essentials qualities of a blogger. Don’t expect a new blog with a freshly registered domain to be able to dominate search engines in a month or two.
To give you an example, www.phpsnippets.info is already indexed in Google, but rankings are bad: As I’m writing these lines, the blog is currently ranked on Google 8th page for the term PHP Snippets. But I can bet that in 3 months, it will be on page 1.
Being patient will not make Google index your blog more quickly, but it will prevent you from frustration, which is in my opinion one of the worst enemies of a blogger.
Use Google webmaster tools and sitemap.xml
Google have a service named Google Webmaster tools, which provides you with detailed reports about your pages visibility on Google.
The first thing to do is to install the free WordPress plugin “XML Sitemaps”, activate it and generate a sitemap. Once done, login to Google Webmaster tools and submit your sitemap. The submitted sitemap will help Google to know about all your web pages.
Note that a sitemap.xml will help Google to index your blog, but it will not enhance your rankings. Also, seems that a page with no incomming links will be ignored by Google, even if the page is in your sitemap.
Get links to your posts
Getting backlinks to your blog is probably one of the most effectives way to get a good ranking in Google results pages. In case of a new blog, backlinks from established sites will definitely help you to get it indexed by Google extremely quickly.
Most people are focusing on building links to their homepage and forget to build links to their posts. It’s a bad thing in my opinion, because most people are searching Google for an information, not for a blog in particular.
Being the first on Google for a generic term such as CSS buttons is indeed very good for your blog. It brings 3000+ unique visitors to CatsWhoCode per month.

-----------------------------
Submit a Complete Sitemap of your Blogger Blog to Google for Better Indexing
Sitemaps, in simple English, are text files (see example) containing a list of all web pages that exist on your site. It is important that you create a comprehensive sitemap as it will help Google and other search engines crawl your site better and that might mean more traffic coming your way in the long run.
The Problem with Blogger Sitemap Files
Ideally, the sitemap file should contain all URLs of a site but if your blog is hosted on blogspot.com (or if you are using a self-hosted version of Blogger with a custom domain), you'll be surprised to know that the default sitemap file (see example) contains only the 26 most recent pages of your blog.
That's a bad thing because some of your older blog pages, that are missing from the system-generated sitemap file, may never get indexed in search engines. There's however a simple solution to fix this problem.
Generate a Complete Sitemap for your Blogger Blog
Step 1: If you haven't done this already, sign-in to your Google Webmasters account and add your blog. For details, check this video tutorial on how to add a blog to Google.
Step 2: Once your blog is added to Google, open the Sitemap Generator and type the full address of your blogspot blog (or your self-hosted Blogger blog).

Step 3: What you get is list of sitemap files that contain each and every page of your blog. You now just have to ping Google, Yahoo and Bing to inform them about these XML sitemaps.
As shown in the video screencast below, you need to manually add each of the sitemap files into your Google Webmaster Tools dashboard but for Bing or Yahoo, you can simply click blue hyperlinks and these search engines will automatically download the relevant sitemap files from your blogspot site.
Once all the Sitemaps are added, your Google Dashboard should look something like this.

If you see a red cross or an orange exclamation symbol instead of the green tick, that means something is wrong with your XML sitemap. Verify that the file exists by typing the sitemap URL in your browser.
Sometimes media enclosures (like MP3 files) in blog posts can create warnings during sitemap submission. And if you have switched from Blogger to WordPress, it still makes sense to submit sitemaps of your old Blogspot blog as that will only help search engines discover your new WordPress pages. Good luck.
How to Change the Width Size of Blogger Blogs
I have provided screenshots of each step - just follow along and you shouldn't have any problems.
Before you start create a backup of your current blog just in case there is a problem.
I will show you how to change the standard template so that the width is the same as this blog. This basically entails 4 things. First you increase the width of the Outer Wrapper and then you increase the width of the Header and then the two columns inside the outer wrapper. This would be the Post column and then the Sidebar column. Lastly you increase the width of your Footer.
You can click on all images to enlarge them.
Step One
Open "Layout" and choose the "Edit HTML" option.

Note: I am using the Minima Template for this demonstration - if you have a different template just find the appropriate section - the steps are the same.
Step Two
Scroll down to the Header section and change the Header Wrapper width to 820px

Step Three
Scroll down to the Outer Wrapper section and change the width to 850px

Step Four
Change the Outer Wrapper "Text-Align" to "left"

Step Five
Change the Main Wrapper width to 550px - this is located right below the Outer Wrapper section. The Main Wrapper is your Post Column.

Step Six
Change the Main Wrapper "float" to "left".

Step Seven
Change the Sidebar Wrapper width to 270px. The Sidebar Wrapper is located right below the Main Wrapper.

Step Eight
Change the Sidebar Wrapper "float" to "right".

Step Nine
Scroll down to the Footer section and change the width to 850px.

Click "Save Template" and you are done.
This is what you have just done;
You widened the size of your usable blog space to 850px. ( The Outer Wrapper )
Inside the Outer Wrapper you have changed the width of the Three Sections that make up your blog.
1) The Header section - 820px
2) The Main Wrapper section which consists of your two columns;
- The Post Column - 550px
- The Sidebar column - 270px
3) The Footer section - 850px
You will notice the Header section is 30px less than the Outer Wrapper.
The two columns add up to 820px - also 30px less than the Outer Wrapper.
I have made the Footer the same size as the Outer Wrapper.
You can play with different widths but be sure that none of the other wrappers add up to more pixels than what you set the Outer Wrapper at. Your two columns should be at least 30px less than the Outer Wrapper so that they have a space between the two columns. The Header should be a little less as you don't want it bleeding right to the edge. (It just looks better) The Footer can be the same width as the Outer Wrapper.
Monday, August 15, 2011
How to get Your Blog Indexed by Google in 24 Hours
How to get Your Blog Indexed by Google in 24 Hours

We all know that content is king and that if you keep blogging… if you keep doing what you love… the traffic and the money will follow suit. While that’s partially true, there is also things that you can do to:
- Index your newly launched blog fast by major Search Engines
- Increase traffic to your blog
- Improve your SERPs (Search Engine Result Positions)
Why wait right? Content can be king but waiting around for traffic to come by itself is not a good way to start blogging. So let’s start…
Getting Indexed
Let’s say you launched a blog today and want it on Google’s results tomorrow. Can this be done? Yes.
Easiest way to get indexed by major Search Engines is to get mentioned by established blogs. This usually will get your blog indexed within 24 hours. But since we are new (i.e the newly launched blog of ours) I don’t think any blogger want to mention it. So instead of begging other bloggers to notice your newly launched blog, you just have to figure out other ways of getting indexed by Google fast. Can it be done? Absolutely! (All it takes a little effort on your side).
1. Blog Communities
There are few blog related community portals that have a very good rankings in Google and other Major Search Engines Results, they are: MyBlogLog, BlogCatalog, Blogged and NetworkedBlogs, particularly MyBlogLog. This means that if you get your blog on these blog communities, Google will have no other choice but to index your blog. So, go ahead and register for an account on these communities and list your blog on it. Once you are done you will have a page like this, this and this.
What to pay attention: Your blog’s description (have a proper write-up), keywords & tags (add related keywords and tags to your listing, this will be used by other members to find your blog), branding (put your logo, avatars, screenshots etc. have a consistent branding everywhere), and list your blog in the correct category.
2. Site Valuation & Stats Sites
Some of those How Much Your Site Worth? sites have a good ranking in Search Engines. All you need to do is to go there and check how much your site worth. This would create a special page for your blog (like this) and consecutively it would be indexed by Google. Here is a list of worthy sites: WebsiteOutlook, StatBrain, CubeStat, WebTrafficAgents, BuiltWith, WhoIs, QuarkBase, URLfan and AboutTheDomain.
3. Feed Aggregators
List your blog’s feed in these feed aggregators Feed-Squirrel, OctoFinder, FeedAdage. Once you have submitted your feed to these sites, they will keep track of your newly published posts and index them in their site. Whenever someone clicks on the blog post title, he/she will be redirected to your original blog post sending you free traffic and getting your latest posts indexed by Google.
4. Social Sites
Registering account on Social Sites with the same username as your blog’s URL is very effective in getting your blog indexed by Search Engines. Especially for those targeted keywords.
For example, if your blog’s name is WhiteElephant, it’s a good practice to register the same username at twitter as @WhiteElephant, and to create a page in Facebook at www.facebook.com/WhiteElephant
So, get account on major Social Sites for your newly launched blog, namely: Twitter, Facebook (create a page for your blog), Digg, StumbleUpon, Delicious etc. By the way, it’s a good pratice to create a separate Social Sites account for each of your projects. This way you can stay focused and post messages that are related to your project. In the long run, this will help build a community that are like-minded around your project.
Note from Darren: it’s worth nothing that many social media sites (like Twitter) use no follow tags on links which means the links don’t really help with SEO. Having said this – it’s still worth getting pages for your keywords/brand as these pages can rank in and of themselves in Google and can help you to have control over numerous search results for the same keyword.
5. Misc Sites
Squidoo is a community website that allows people to create pages (called “lenses”) on various topics. Creating a topic that is related to your blog and then including your feed in that page would help your blog get indexed by Search Engines. Squidoo used to have a really good ranking in Google results, but not so much today. But it’s still ranks well and it shouldn’t be neglected.
ChangeDetection is a website that monitors sites for changes. When you monitor a particular site using ChangeDetection, it will ask you whether you want the notices to be public or private. If you say public, it will be published in their news section. For example; AdesBlog.com got an update today, type of update: text additions etc. This of course will get picked up by Search Engines and Search Engines in return will index your blog.
Technorati is a search engine for searching blogs. According to Wikipedia, as of June 2008, Technorati was indexing 112.8 million blogs and over 250 million pieces of tagged social media. It’s a dying breed, but not just dead yet. You have to definitely register for an account and get your blog listed on Technorati.
That’s it. Once you are done with creating accounts and submitting your newly launched blog in the above mentioned sites, you should see your blog in Google’s Search Results within 24 hours. Most of the time it will appear within the next few hours only.
Lastly, getting indexed is one thing but sustaining that traffic is another. And this is where the Content is King phrase should truly be emphasized. Because, without a good and valuable content, all your effort will be just wasted.
I hope you have found this post useful.
How to Index your Blogger into Google Search Engine
How to Index your Blogger into Google Search Engine

Many bloggers have no idea about how to make appear their blog in search engines,they use many keywords ,sending mails and messages to buddies,i prefer another method.Of course this keyword make a good result in search engines, but without indexing , what is the use of it ? Remember if you have good content in your post and you wish to Read many friends,then index your blog into search engines.Especially GOOGLE which have billions of users.
Please Read this post before indexing your blog.
After Just Click here to Add URL of your blog directly into GOOGLE search Engine.
Google can't make ay predictions or guarantees about when or if they will appear.
You should Add Full URL ,
including http:// as prefix,
For example http:://www.blogknol.blogspot.com
You add comments about your site,If your website/blog is related about mobile then you can add keywords of mobile of your site as comments.
Sunday, August 7, 2011
AdSense Overview Meaning

What does the page impressions on Google ad sense mean???
Page impressions is the number of times a page is displayed where you have placed a Google ad. For example, you have a page where you placed 1 (one) Google ad, and the page was viewed 10 times. That means that your ad had 10 page impressions.
------------------------------

Ad CTR
For standard ads, your ad click through rate (CTR) is the number of ad clicks divided by the number of individual ad impressions.
Ad CTR = Clicks / Ad impressions
For example, if your ad received 5 clicks out of 1000 ad impressions, your ad CTR would be .5%.
For link units, the number of ad clicks divided by the number of impressions for the page of ads that appears when a link unit is clicked.
----------------------------------------Effective CPM

Effective cost-per-thousand impressions (eCPM) is a useful way to compare revenue across different channels and advertising programs. Essentially, effective CPM represents your estimated earnings for every 1000 impressions you receive.
Effective CPM doesn't represent how much you have actually earned -- rather, it's calculated by dividing your estimated earnings by the number of page impressions, then multiplying by 1000.
For example,
if you earned an estimated $0.15 from 25 page impressions, then your page eCPM would equal ($0.15 / 25) * 1000, or $6.00.
If you earned an estimated $180 from 45,000 ad impressions, your ad eCPM would equal ($180 / 45,000) * 1000, or $4.00.
----------------------------------------------
Adsense vs infolinks - advantage and disadvantage merits and demerits
Adsense vs infolinks - advantage and disadvantage merits and demerits

So this blog does not get much in the form of revenue but just a little comparison that I was running on which of these 2 bring in money and which at a higher rate. so if your interested in a small blogs rate difference between the infolinks in text double underline links revenue vs the adsense revenue then read on.
So far i been running both of these ad revenue products side by side on this blog which does not get a huge amount of visitors and does have a fairly large bounce rate but for those that actually read the blog I will be removing the infolinks. here is a little bit why.
i have had in the past month 4 clicks on the infolinks (yes i know that is not much) which brings in a revenue of only $.04 total.
to compare with adsense I have in this month only 1 click (which is even less) but the difference is that the revenue for adsense 1 click was $.66 which by far out ways the infolinks.
so from just an earnings perspective adsense makes more sense.
visual perspective. the more and more I think about the difference between adsense and infolinks the more I start regretting ever putting on infolinks. To me infolinks method of getting clicks is by trying to trick the user into clicking on a link thinking it was something useful that the author posted there. I believe this takes away from the readability and the credibility of the article that the user reads. This is my second reason for not using Infolinks.
Adsense on the other hand gives you much control where to place the ads and what type of ads you do place. from this perspective i do not see the adsense taking away from the page and i try to place the ads in ways that they only ad to the site and not just be the very first thing you see. like an ad in the banner on the top of the page.
Another thing is the reports that infolinks gives you. The lack of info compared to adsense just made me want to use adsense even more. adsense's layout gave me much more options to figure out where exactly the clicks where coming from and it also integrates in with google analytics which is very nice because you can see where on the page the click actually happened and on what pages.
with all these things I believe that adsense by google is by far better than infolinks.
I hope this helps you make a better informed choice about what advertising unit to use on your own site.
Benefits Of Hosting Your Blog On Your Domain Name

Internet markets today understand the immense benefits of hosting their blogs on their own domain.
If you are serious about wanting to earn money on the internet, then you will need to set up a blog and host it on your domain. Outlined below are some of the main benefits which you can enjoy from hosting your own blog on your domain.
If you have a blog hosted on your domain, you have control over everything about your blog. You can have your own layout and design for your blog, which means you can have a blog that matches your website logo. You can make your blog as unique as you want. This gives you an edge against other competing blogs in the same niche which may have similar layouts. You also have complete freedom to do anything you want with your blog. By hosting your blog on your domain, you can control your blog in many ways you want and you can add any features you want.
By hosting your blog on your domain name, you make it easier for people to remember your blog.
Hosting your blog on your domain means that you can develop and promote your own brand using your blog. You can make your blog headings similar to your website. In terms of search engine optimization (SEO) and advertising, this is very important because you will be advertising and optimizing your own domain and your own brand. SEO is also effective to do with your own domain name that includes your keywords. This will increase your blog’s visibility on search engines.
By hosting your blog on your website, you have added security. This means that you don’t have to worry about losing your information or getting locked out of your account.
You present a professional image by having your online business logo on your blog. This gives you ad edge against other competing website or blogs.
Based on the advantages outlined above, if you are serious about your online business, you must consider hosting your blog on your own domain.
Friday, August 5, 2011
how to edit blogger labels how to rename blogger labels Renaming A Label Across All Blogger Posts

how to edit blogger labels Renaming A Label Across All Blogger Posts how to rename blogger labels
Choose 'all' posts -> Add new label -> Remove old label.
shows the detail
If you ever have the need to change an applied label name across all of your posts, you may think you need to do it manually post by post. Fortunately this is not the case. To "rename" a label, we simply need to select all posts with the original label, add our new label name (to replace the original) and finally remove the original label.
Navigate to Posting -> Edit Posts:
1.

2
In the far left click on the name of label want to edit and select all posts:

3

4
Then in the Label Actions... drop down, under Apply Label select New
Label...

5
And enter the new label name:

6
Then while you have the same posts still showing select Label Actions... -> Remove Label and click on the label you wish to remove:

--------------------------------------------------
he Edit Posts page includes options for displaying posts by label, and for applying or removing labels on batches of posts. To get there, visit the Posting | Edit Posts tab, or just click the Manage Posts link on your dashboard.

This page has all labels in use by this blog listed on the left-hand side. Each individual post also has its particular labels marked in green next to its title. By default, posts with all labels are shown.

(Note: You'll only see the labels here if you have at least one post already labeled. You can label an individual post on the posting form.)
If you click the label links on the left-hand side, the list of posts will be narrowed down to show only posts with that particular label.
Each post has a checkbox next to it. If you want to make a change to multiple posts, first check all the ones that you want to affect. Then select an option from the "Label Actions..." menu.

This menu includes options for adding any of your labels to the select posts, as well as for removing labels already on the posts. You can also select "New Label..." if you want to create a label that you don't already have.
If you want to edit a label across all posts, you can do so by removing it and then adding a new one. For instance, say you want to change the label "Books" to "Reading." Just follow these steps:
- Click the "Books" label link on the left side of the page.
- Click the "Select All" link at the top of the list of posts.
- From the "Label Actions..." menu, choose "Remove label > Books."
- From the "Label Actions..." menu, choose "Apply label > New Label..."
- Enter "Reading" as your new label. (If you already have some posts with the label "Reading," you can simply apply that label, without making a new label.)
How To Create Google Custom Search Engine? google search engine earn money from blogger
google search engine earn money from blogger l How To Create Google Custom Search Engine?

When it comes to crawling the internet or a website nothing can surely beat Google's searching technique. Blogger Templates that are found in various designs and colours often have custom search boxes in it, which I am sure you might have observed are incapable of displaying the relevant results. These search boxes by default are limited to their ability of searching each and every word of your blog. The best solution is to use Google Custom Search Engines (CSE) that are extremely efficient in digging out the most important data from your blog and displays it to the visitor. This increases the number of pageviews and page impressions of your blog because the reader is kept engaged in reading more and more. Further you can easily integrate your Google AdSense Ads to your Google Custom Search box, which again increases your blog revenue for every click made on the search results. An Example of such search engine can be found below every post of this (MBT) blog. So lets create and install a beautiful Google Search box for your blog.
How To Create a Custom Google Search Engine?
- Go To Google CSE
- Hit the create custom search engine button
- Fill the form as shown in the screenshot below,
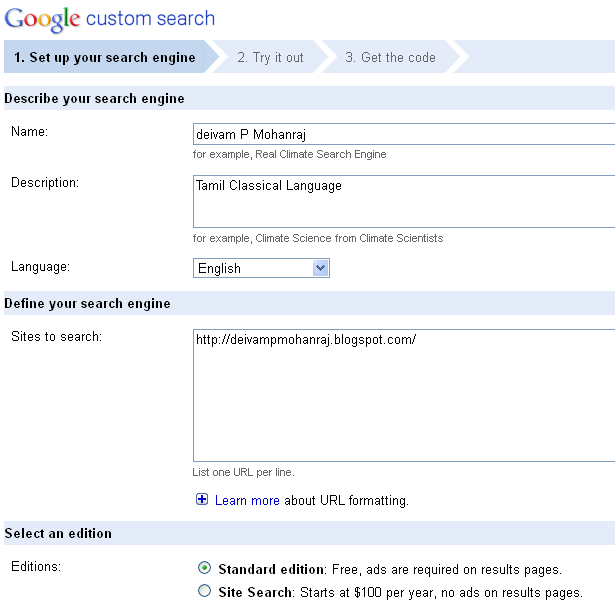
4. The Click the next button and choose the Design for your search engine. You can click the "Customize" button to edit the colours and look.
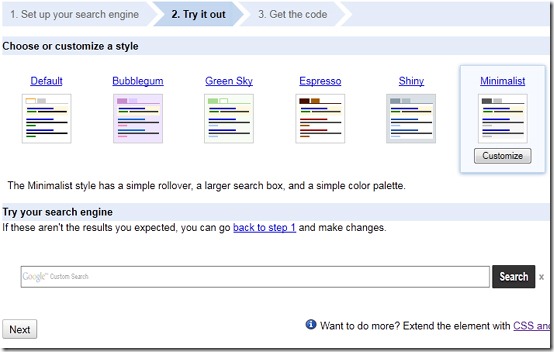
5. Hit the next button and then click the "Look and feel" link on the next page as shown below,

It will bring you a page where you will find three layout options i.e Full -width, Compact and Two Column as shown below,

- If you wish to add the search box just below posts as I have done on my blog then choose Full-width
- Or if you wish to display the box and results on the sidebar then choose compact
- Else if you wish to add your search box to your sidebar and display the search results above the post title then choose Two Column
6. Finally hit "save & get code" button and jump to the next part of our tutorial.
Add Google Custom Search Engine To Blog Posts
To add the search engine just below your blog posts as we have done on MBT then please follow the steps below,

- Go To Blogger > Design > Edit HTML
- Backup your template
- Click the Expand Widgets Templates Box
- Search for
- Just below it paste your Blog Post Search Engine Code (Full-width)
- Save and you are done!
- View your blog to see it appearing just below posts.
Add Google Custom Search Engine To Blog Sidebar
- Go To Blogger > Design
- Choose a HTML/ JavaScript Widget
- Paste your Sidebar Search Engine Code (Compact or Two Column) in it
- Save and you are done!
- View your blog to see it working just fine
Changing your default search box to Google Custom Search Engine Box is an important step that you must take as early as possible. You will see the difference in your analytics the next week. In the next post as shared below you will learn to integrate your AdSense Ads to your Custom Search engine and increase your Adsense earnings.
---------------------------------
How to Display Ads in Google Custom Search Engine?
After you have successfully created your custom search engine and installed it on blogger, you need to monetize it by following the simple steps below,
1) Go To Manage CSE
2) Click the Control Panel link close to the name of your search engine. In my case it is My Blogger Tricks as shown below,

3) Then click the link Make Money at the left pane,

4) The finally on the next window that appears simply click the option that says "I already have an AdSense account" and fill the simple form with your email ID, postal code and the last 5 digits of your mobile number that you submitted to AdSense while creating an account.

5) Hit the Submit button and you are done!
6) Log into your Adsense Account and simply click the link that may appear at the top of your dashboard which will ask you whether or not you wish to let the Custom Search engine to access your AdSense Ads. Simply click it and enjoy the happy new earning! =)


